Need Safe Places To Practice Vocals? Most of all do you need to know how to safely learn how to do scream/distortion vocals? Well, this one is for you! ♥
Come visit our news page to see what new collections and lines we have gotten in. Anywhere from handmade to manufactured! Click Here!!!
♥
Come visit our news page to see what new collections and lines we have gotten in. Anywhere from handmade to manufactured! Click Here!!! ♥


First, lets start with safe places if you can’t do vocals at home. Here are some Ideas.
🚗 1. Your Car (Top Choice)
Why it works
Cars are surprisingly well sound-insulated
You can control volume, posture, and warm up properly
No neighbors directly next to you
Tips
Park somewhere quiet (empty parking lot, industrial area, roadside pull-off)
Turn the engine off so you don’t strain over noise
Crack a window slightly for airflow
Sit upright—don’t hunch
⭐ Many professional vocalists still practice this way.
————————————————————————————————————————————————————————————————————————————————————-
🌲 2. Remote Outdoor Areas
Good options
Forest trails (far from people)
Empty beaches
Fields, hills, or countryside areas
Abandoned quarries (only if legally accessible & safe)
Tips
Face away from paths or homes
Go early morning or late afternoon when fewer people are around
Bring water and stop if your throat feels scratchy
⚠️ Avoid places where someone could mistake screaming for distress.
————————————————————————————————————————————————————————————————————————————————————
If you can afford or have access to -
🎧 3. Music Rehearsal Studios
Why it’s ideal
Soundproofed
Designed for loud vocals
You can practice safely with proper posture
Affordable ideas
Hourly rehearsal rooms
Community art centers
University music departments (some rent rooms cheaply)
💡 Ask for “vocal practice room” specifically.
————————————————————————————————————————————————————————————————————————————————————-
🏭 4. Industrial or Commercial Zones (After Hours)
Examples
Warehouses
Shipping areas
Business parks on weekends
Tips
Stay inside your car or near it
Be aware of security patrols
Don’t linger too long in one spot
————————————————————————————————————————————————————————————————————————————————————-
🎤 5. Storage Units (With Permission)
Some musicians rent climate-controlled storage units specifically for practice.
Only do this if
The contract allows sound
It’s a private unit (not shared hallways)
You bring ventilation (open door between takes)
————————————————————————————————————————————————————————————————————————————————————
🏠 6. Friend’s Garage / Basement
Why it works
Concrete dampens sound
Less echo than bathrooms
Easier to control acoustics
Add:
Rugs
Mattresses against walls
Curtains or moving blankets
————————————————————————————————————————————————————————————————————————————————————
❌ Places to Avoid
Bathrooms (harsh echo = bad technique)
Stairwells (security + echo issues)
Public restrooms
Anywhere people might think you’re in danger
————————————————————————————————————————————————————————————————————————————————————-
🔥 VERY IMPORTANT: Vocal Safety
Since you’re screaming:
Warm up first (lip trills, hums, fry control)
If it burns, hurts, or scratches → stop
Hydrate constantly
Limit sessions to 10–20 minutes at first
————————————————————————————————————————————————————————————————————————————————————-
Now, Lets get to the lesson part for distortion/scream vocals.
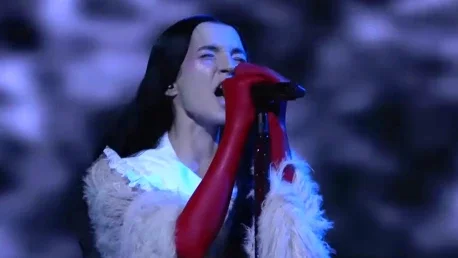
{Hello, this is co-owner of eevee luna. My hobby is singing and music. I have been getting into harder vocals and honestly this is the best I have found in info for how to get into it and be safe. I seen tons of peple give half ass answers and it feels more like a show off. Please, be safe and don’t do what they do. It will take a while. If you are a pro singer already then you will be able to do this a lot easier. I have a amy lee/ lilith max/ poppy kinda sound naturally when I sing. So this guide might be leading more for soft spoken people such as myself. Over all I think this could help everyone and I really want to make sure people are keeping it safe. This isnt really on my brand. I do plan to carry more alt/punk/goth merch at some point for sure, however right now I am just getting started on the online shop. I love people so much. I think you all are amazing. Singers and vocalist, you make this world magical. You heal and touch souls. Even in the harsher music area, its emotional and an expression. As to why I am getting into it now as well. Its healed me through so much recently and I have a huge thank you to artist like poppy for understanding that pain and projecting it into the world. Thank you Poppy. You inspired me and you gave me the hand to get back up. Harder music help heal me in my darkest and I will now indulge myself with you. I love you. I love all of you. Keep spreading your wings. Tell your soul, Tell your heart, Tell your truth. Okay, now for the lessons I found.}
————————————————————————————————————————————————————————————————————————————————————-


🌸 First: Important Truth (this will calm you)
Roaring ≠ yelling.
Poppy doesn’t brute-force her voice — she uses distortion layers on top of a relaxed, supported tone.
If your voice is naturally soft:
You already have good airflow control
You’re less likely to force
Fry screams will come more naturally
That’s actually a gift ✨
🔥 What a “Roar” Actually Is
A roar is usually:
False cord engagement
Mixed with fry texture
Supported by breath + chest resonance
NOT high volume
Think:
angry sigh with texture
not
angry yell
🫁 STEP 1: Body Setup (Non-Negotiable)
Before any sound:
Stand or sit upright
Shoulders relaxed
Jaw loose
Tongue resting flat
Breathe into your lower ribs, not chest
Put one hand on your stomach and one on your ribs.
You should feel expansion sideways, not up.
🌬️ STEP 2: Learn “Controlled Air Noise” (FOUNDATION)
This is where soft voices shine.
Do this quietly:
Exhale like you’re fogging a mirror
→ “haaaaa”Now make it breathy + gritty
→ “hhhhaaa”Imagine you’re annoyed, not angry
⚠️ This should feel:
Raspy but NOT painful
Like vibration above your vocal cords
No throat burn
If it burns: stop.
🐸 STEP 3: Wake Up False Cords (Roar Muscle)
False cords live above your normal voice.
Try this:
Do a gentle cough (not harsh)
Or a sleepy groan like waking up
→ “uhhh…”Or a cartoon villain chuckle
→ “huh huh huh”
You should feel a thick, buzzy sensation — NOT tight.
That buzz = roar material 😈
🔥 STEP 4: Quiet Fry Activation (Your Likely Strength)
This is VERY QUIET.
Say “uh” like you’re bored
Let it crackle at the end
→ “uhhhh…”Don’t push air — barely any airflow
It should sound:
Crackly
Like a creaky door
Almost whisper-volume
This is fry, not screaming yet.
🐲 STEP 5: Combine → Soft Roar (Poppy-Style)
Now the magic:
Start with a low sigh
Add the false cord buzz
Sprinkle fry texture
Keep it LOW volume
Try:
“Rrrrruh”
“Hrrraaa”
“Grrr”
Think monster purring, not screaming.
If done right:
Your throat feels normal afterward
Your voice is still clear when you speak
You can do it repeatedly without fatigue
🧪 STEP 6: Turn It Musical
Once it feels safe:
Add pitch (start low)
Shape vowels (“ah” and “uh” are safest)
Short bursts only (1–2 seconds)
Poppy often:
Starts clean
Switches to distortion
Drops back to clean quickly
Practice switching, not holding.
⛔ Red Flags (STOP if these happen)
Sharp pain
Burning
Losing your speaking voice
Needing to clear your throat
These mean you’re pushing, not roaring.
—————————————————————————————-
This is what I will be practicing as well with you.
🖤 Your Practice Plan (15 Minutes Max)
2–3x per week
Warm-up (5 min): hums, lip trills
Air noise + sighs (3 min)
False cord groans (3 min)
Fry crackles (2 min)
Soft roar combos (2 min)
Done. Walk away while it still feels easy.
——————————————————————————————————————-
🌙 Final Truth (This Part Matters)
You do not need a loud voice to roar.
You need:
Control
Patience
Micro-sounds before macro-sounds
Poppy’s roar sounds huge because it’s efficient, not forceful.
————————————————————————————————————————————————————————————————————————————————————


Now, lets move on to the next part of the lesson. ♥
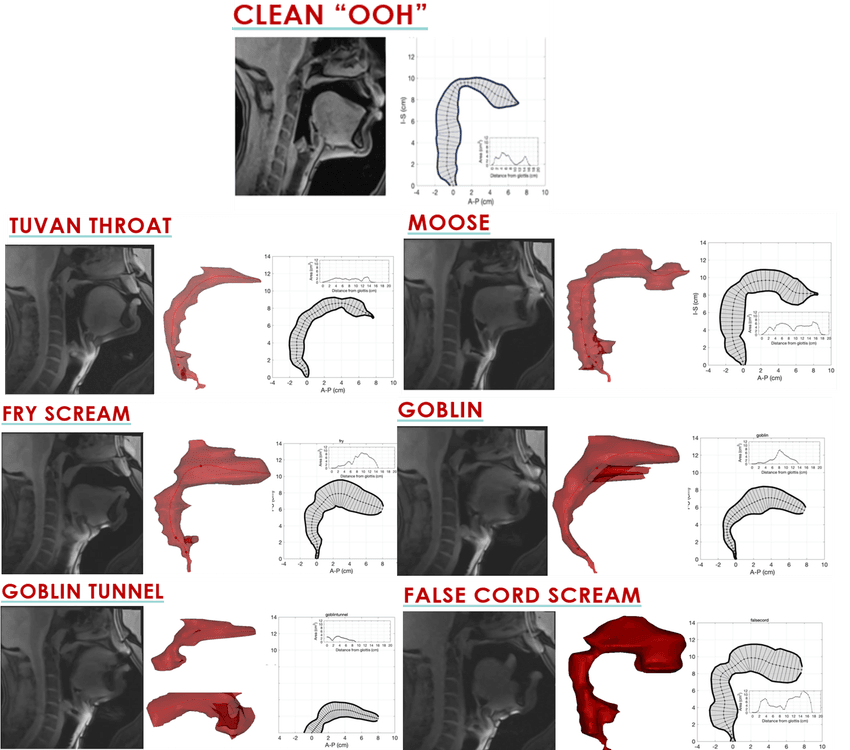
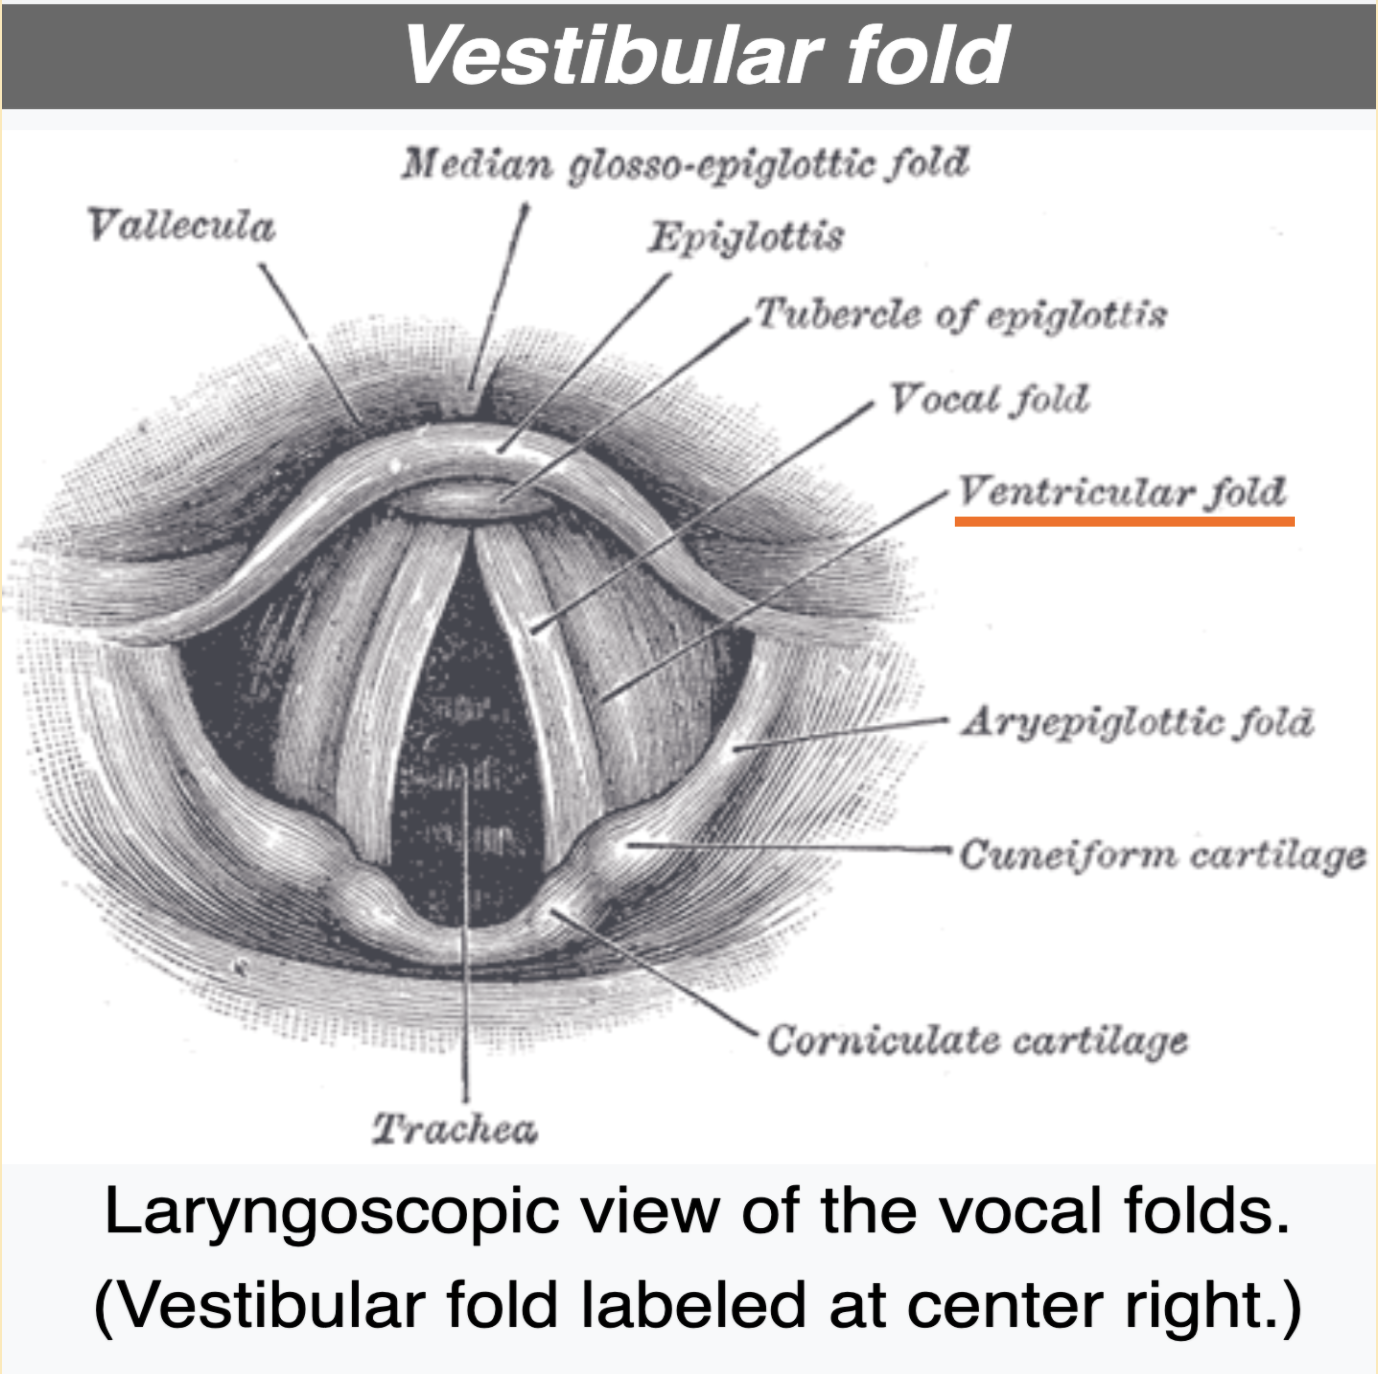
🧠 PART 1: Fry vs False Cord — How to Tell the Difference
This is HUGE. Knowing what you’re doing prevents damage.
🔹 Fry Scream (Your Natural Entry Point)
What it feels like
Very low airflow
Crackly / creaky
Happens easily at quiet volume
No pressure in chest
Where you feel it
High in the throat
Almost behind the nose
Like a lazy vocal cord vibration
Test
Say “uhhhh” like you’re bored and tired.
If it crackles → fry.
✔️ Safe
✔️ Quiet
✔️ Perfect for soft voices
🔹 False Cord (The “Roar Engine”)
What it feels like
Thicker
Airy but heavy
Like controlled coughing without the cough
Where you feel it
Above your vocal cords
Mid-throat but NOT tight
Chest vibrates slightly
Test
Do a sleepy groan:
“Uhhhh…” (like waking up)
If it sounds husky and wide → false cord.
✔️ Roary
✔️ Full
❌ Dangerous if forced
🔥 The Roar = Fry + False Cord + Support
Not yelling.
Not pushing.
Not loud.
Think: texture layered over breath.
—————————————————————————————————————————
🫁 PART 2: Breath Support (THIS MAKES OR BREAKS IT)
Put one hand on your belly, one on your ribs.
When you inhale:
Belly expands
Ribs expand sideways
Shoulders stay relaxed
When you exhale:
Belly slowly moves inward
You resist the air, don’t dump it
Practice:
Hiss softly:
“ssssssss”
Hold it steady for 10 seconds.
If it wobbles → you’re pushing too hard.
🔥 PART 3: Warm-Up Routine (DO THIS EVERY TIME)
Never skip this. Ever.
1️⃣ Gentle Clean Warm-Up (5 minutes)
Lip trills: “brrrr”
Humming: “mmm”
Sirens (quiet): low → mid → low
No distortion yet.
2️⃣ Air Noise Activation (2 minutes)
Fog a mirror:
“haaaa”
Now add attitude:
“hhhhaaa”
This teaches safe airflow.
3️⃣ False Cord Wake-Up (3 minutes)
Pick ONE:
Sleepy groan: “uhhh”
Monster purr: “grrr”
Villain laugh: “huh huh”
Low volume.
Loose jaw.
No tightening.
4️⃣ Fry Crackle (2 minutes)
Say:
“uhhh…”
Let it break.
Don’t push air.
It should feel stupidly easy.
🐲 PART 4: Roar Building (This Is Where You Want to Be)
Now we combine.
Step A: Soft Roar
Start with a sigh
Add false cord buzz
Add fry texture
Try:
“Hrrraa”
“Rrruh”
“Grrrr”
👉 If it feels like yelling: STOP
👉 If it feels buzzy and easy: YES
Step B: Controlled Burst
Roars should be short.
1–2 seconds max.
Example:
“RAH”
“GRR”
Then stop.
Breathe.
Reset.
This is exactly how Poppy does it.
———————————————————————————————————-
🎶 PART 5: Practice Syllables (SUPER IMPORTANT)
These vowels protect your voice:
✔️ “ah”
✔️ “uh”
✔️ “oh”
Avoid at first:
❌ “ee”
❌ “ih”
Good practice words:
“Run”
“Rise”
“Burn”
“Grow”
“Break”
Say them clean → add texture → drop back to clean.
That switch = professional control.
——-
🚗🌲 PART 6: Practicing in Public Spaces (Confidence Tips)
In Your Car
Park somewhere quiet
Engine off
Crack a window
Sit upright
Start QUIET.
You don’t need volume.
Outdoors
Face away from people
Pick open space
Early morning or late afternoon
Short sessions
Remember: you’re training muscles, not performing.
⏱️ PART 7: Weekly Practice Plan
3 days a week MAX at first
🕒 15–20 minutes total
Warm-up (5)
Air + false cord (5)
Fry + soft roar (5)
Cool down humming (2–3)
STOP while it still feels good.
🚨 PART 8: Red Flags (Read This Twice)
If you feel:
Burning
Sharp pain
Scratchiness
Hoarseness after
❌ You pushed
❌ You’re not failing — you just went too far
Rest 24–48 hours.
🖤 PART 9: The Poppy Truth (This Matters Emotionally)
Poppy’s power doesn’t come from loudness.
It comes from:
Control
Contrast
Confidence
Texture over softness
Your soft voice is not a weakness.
It’s why this will work for you.
You are building a controlled monster, not a scream.
————————————————————————————————————————————————————————————————————————————————————
{Its me again! Okay, so this is the 30day lesson I learned so I am going to post everything I found here for you now}
————————————————————————————————————————————————————————————————————————————————————-
🗓️ PART 1: 30-Day Roar Training Plan
(Designed for soft voices → Poppy-style contrast)
🐣 WEEK 1 — Foundation & Safety
Goal: Control, not volume
3 days this week
Clean warm-ups (5 min)
Air noise + sighs (3 min)
Fry crackles (3 min)
False cord groans (3 min)
Cool down hums (3 min)
🚫 NO full roars yet
🧠 Learn sensations, not sounds
🐲 WEEK 2 — Texture Building
Goal: Add grit without force
3 days
Warm-up (5)
False cord purrs (5)
Fry activation (3)
Soft micro-roars (2–3 sec max)
Cool down (3)
🎧 Record yourself once this week (quietly!)
🔥 WEEK 3 — Controlled Roars
Goal: Consistency + switching
3 days
Warm-up (5)
Roar bursts (5)
Clean → roar → clean transitions
Short phrases only
Cool down (3)
⚠️ Stop before fatigue
👑 WEEK 4 — Musical Integration
Goal: Sound big without yelling
2–3 days
Warm-up
Roar phrases on lyrics
Dynamics: whisper → roar → whisper
Cool down
You should still be able to talk normally after.
————————————————————————————————————————————————————————————————————————————————————-
🎧 PART 2: How to Record & Self-Check Safely
Setup
Phone mic is fine
Quiet room or car
Don’t aim mic directly at mouth
Keep volume LOW
Listen for:
✔️ Grit sitting on top of voice
✔️ No strain
✔️ Even airflow
✔️ No “yelling” quality
Red flags in recordings:
❌ Sudden loud spikes
❌ Tight, sharp sounds
❌ Hoarse talking after
If it sounds smaller but clean = you’re winning
🎵 PART 3: Adding Roars Into Songs (Poppy Method)
Poppy uses contrast, not constant distortion.
Practice pattern:
Clean line
One word with texture
Back to clean
Example:
“I feel it in my BONES”
Only distort BONES.
Safe starter words:
Break
Burn
Rise
Run
Grow
Fight
Avoid screaming whole sentences at first.
🧠 PART 4: Sound Bigger Without Being Louder
THIS is the secret.
Use:
Open vowels (“ah”, “uh”)
Slow airflow
Lower pitch
Mouth slightly open (yawn space)
Visualize:
Your sound expanding outward, not pushing forward.
Think fog filling a room.
🐲 PART 5: Roar Types You Can Build Toward
🖤 Soft Monster (Your Core Style)
Fry + false cord
Low volume
Controlled
Creepy-powerful
🔥 Hybrid Roar
Clean tone underneath
Grit layered on top
Very Poppy-coded
🩸 Full Roar (Later, Optional)
Requires months
Only after consistency
Still NEVER yelling
You don’t need this to sound incredible.
————————————————————————————————————————————————————————————————————————————————————-
🧘 PART 6: Cool-Down (DO THIS ALWAYS)
After practice:
Gentle humming
Lip trills
Light yawns
Sip water
If your speaking voice feels tired → you overdid it.
🖤 PART 7: Confidence + Mental Block (This Matters)
You will feel:
Silly
Quiet
“Not metal enough”
IGNORE that voice.
Roars grow internally first.
Volume comes last.
The goal isn’t to sound scary.
The goal is to sound controlled.
🐉 FINAL TRUTH (Read This Twice)
You don’t need to become louder.
You need to become denser.
Soft voices that learn distortion sound:
More haunting
More controlled
More unique
That’s exactly why Poppy stands out.
————————————————————————————————————————————————————————————————————————————————————
{Okay, next we are going in more depth of the lesson and polish of the scream/distortion vocals}
————————————————————————————————————————————————————————————————————————————————————
🐲 PART I: Your Custom Roar Phrase (Core Identity Sound)
This phrase is designed for:
Soft voices
Fry + false cord blend
Low strain
Emotional power (Poppy-coded)
👉 Your Roar Phrase
“I RISE FROM THE QUIET”
How to practice it:
Say it clean.
Add texture ONLY on RISE.
Later, add texture on QUIET.
Never roar the whole sentence.
Example:
“I RISE from the quiet”
This trains control + contrast.
🎯 PART II: Find Your Exact Scream Range (Safely)
We’re finding where your roar naturally lives.
Step-by-step:
Hum comfortably (mmm)
Slide down until it feels warm and easy
That pitch = home base
Add gentle false cord buzz
🔑 Your roar should live just above your lowest speaking pitch, not high.
If it feels high → strain risk
If it feels low + wide → perfect
🎤 PART III: Stage-Ready Scream Routine (Pre-Performance)
Use this every time, even for practice.
10-Minute Routine
Lip trills (2 min)
Gentle sirens (2 min)
Air noise “haaa” (2 min)
False cord groans (2 min)
Fry crackle (2 min)
No roars yet.
This wakes up the engine safely.
🎶 PART IV: Blending Roars Into Pop / Alt Tracks
This is where your voice becomes art.
The Poppy Formula:
Clean = vulnerable
Roar = power
Silence = impact
Safe structure:
Verse: clean
Pre-chorus: breathy tension
Chorus: ONE textured word
Drop back to clean
Never roar continuously.
🧪 PART V: Self-Diagnosis Cheat Sheet
If it feels…
✔️ Buzzy + loose → correct
❌ Tight + sharp → stop
❌ Burny → stop immediately
✔️ You can speak normally after → correct
Mirror check:
Jaw loose
Neck relaxed
No veins popping
🌿 PART VI: Recovery & Voice Care
After sessions:
Warm tea (not hot)
Steam inhalation
Silence for 10–20 minutes
Gentle hums
Weekly:
At least 2 full rest days
Hydration all day
Your voice grows in rest.
🧠 PART VII: Confidence Training (Mental Game)
Say this (seriously):
“I don’t need to be loud to be powerful.”
Practice at whisper volume first.
Power comes from intent, not decibels.
🐉 PART VIII: Long-Term Growth Path (6 Months Ahead)
Month 1–2:
Fry control
False cord awareness
Micro-roars
Month 3–4:
Hybrid screams
Musical phrasing
Recording practice
Month 5–6:
Stronger roars
Endurance
Performance confidence
No rushing. No damage.
🖤 FINAL MESSAGE (Read This Slowly)
You are not trying to become someone else’s scream.
You are building:
A controlled roar
A soft voice with teeth
A contrast that feels dangerous and beautiful
That takes patience — and you already have the hardest part:
awareness.
————————————————————————————————————————————————————————————————————————————————————
{ I really hope this helps a lot of people. You don’t need to have a soft voice to practice this. Honestly, it feels like the lessons given to me are for my voice type alone. Don’t feel like you can’t get anything from this. - Anyway, my bango cat is going crazy with this post. If you have steam you should check out bango cat. Its so cute and fun. Work from home and rack up those points for more cute kitties. ♥}
Goodbye for now and good luck!!